Today I have a different post - a smoothie recipe! I love to cook and love food, so I thought I would share a part of that.
I love making this smoothie in the summer, but also just for a quick & healthy breakfast or snack.
Ingredients:
1 tblspn passionfruit pulp
1 cup frozen mango
1/2 - 1 banana
1/2 cup yoghurt (I use vanilla)
1 cup+ milk
All you do is put the ingredients together in a blender and blend until smooth! You can add more milk or yoghurt if you want it thicker or thinner (you may need more milk if you want a bigger smoothie).
You can of course add any additional ingredients - sometimes I add some frozen berries into the mix. But you can take away ingredients, use fresh fruits, do whatever you like with it - I find this is a great base for creating any smoothie!
Let me know if you try out this recipe!
- Ella
Saturday, 28 November 2015
Saturday, 21 November 2015
Priceline Haul
As I'm sure many of you know, this Wednesday and Thursday was the 40% off sale in Priceline for all cosmetics. I took the opportunity to pick up some products I've been wanting to try.
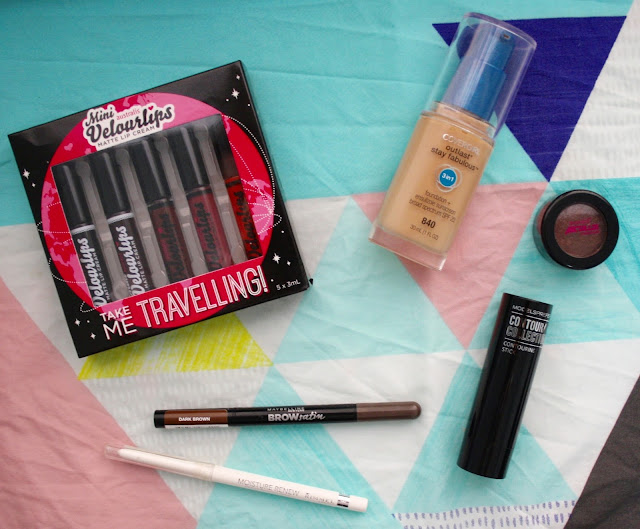
The Australis Mini Velourlips set in Reds & Darks is a cute set of 5 travel sized Velourlips. It includes a classic red, two dark berry shades, a deep purple and a black. I really wanted to try some of the deeper shades so this was a great way to try them out! I did a review of Velourlips here.
I also picked up another Australis product, the Metallix eyeshadow in Plum Diddy, a deep plum-brown. Since I loved my one in Guns and Rose Petals, I decided to pick up another one. This one isn't as intense, but is very creamy and still a gorgeous shade. I also did a review on my Australis review post.
The Maybelline Brow Satin in Dark Brown is an interesting new product which seems really good for when you're in a rush doing your makeup and want to quickly fill in your eyebrows. On one side is an automatic brow pencil, and on the other side is a kind of sponge applicator which dispenses powder. I am really excited to use this!
Mini Velourlips
The Australis Mini Velourlips set in Reds & Darks is a cute set of 5 travel sized Velourlips. It includes a classic red, two dark berry shades, a deep purple and a black. I really wanted to try some of the deeper shades so this was a great way to try them out! I did a review of Velourlips here.
Australis Metallix
I also picked up another Australis product, the Metallix eyeshadow in Plum Diddy, a deep plum-brown. Since I loved my one in Guns and Rose Petals, I decided to pick up another one. This one isn't as intense, but is very creamy and still a gorgeous shade. I also did a review on my Australis review post.
Covergirl 3 in 1 Foundation
I wanted to try out a fuller coverage foundation so I picked up the Covergirl Outlast Stay Fabulous 3-in-1 Foundation in Natural Beige. This foundation claims to be long wearing, blendable and provide heavy coverage, and includes SPF 20, and after hearing so many great reviews on it I thought it would be the perfect time to try it out.
Models Prefer Contour Stick
The next thing I picked up was the Models Prefer Cream Contour Stick. I don't own any cream contouring products so I picked this one up to try. It is a bit warmer than I was expecting but hopefully it will still work well!
Maybelline Brow Satin
Rimmel Moisture Renew Lip Liner
The last thing I bought was the Rimmel Moisture Renew Lip Liner, which is basically a universal/transparent lip liner, meaning you can wear it under literally any colour lipstick and it will keep it in place & prevent bleeding/feathering. I think this is a really good investment as it can be the only lip liner you really need!
What did you all pick up from the sale? Did you manage to get everything you wanted? Did you splurge on things you didn't need? Let me know!
- Ella
Saturday, 14 November 2015
Australis Review: Velourlips, Metallix, F&F & more
Australis is a pretty new brand to me, but recently I have purchased quite a few of their products, and I have to say I am really liking the brand so far. So I decided to share with you all the products I own and how I like them - including the Velourlips, Metallix eyeshadow, Fresh & Flawless powder and the Go Camo concealer.
As for them lasting, they stay very well without eating or drinking and usually will still stay on the lips if you're not eating oily foods etc. I also found that blotting my lips after applying them helped them stay on even longer.
Rating: 4/5
I got the shade 'Medium', the middle shade of 3 shades. For a medium shade I found it to be very light, but it works for me. I would say the biggest downfall of tis product would be the lack of a range of shades.
Rating: 3.5/5
Velourlips
I currently own four of the Velourlips Matte Lip creams - Pa-ree, Hon-o-loo-loo, Mi-am-ee, and Doo-bai.
 |
| L-R Doo-bai, Mi-am-ee, Hon-o-loo-loo, Pa-ree |
These lip creams go on quite nicely and are very pigmented on the lips. They dry quite quickly but not too quickly to work with. They feel quite dry, but I haven't had a problem with them, even on my dry lips.
 |
| Clockwise from top left; Pa-ree, Hon-o-loo-loo, Mi-am-i, Doo-bai |
Rating: 4/5
Metallix Eyeshadow
This eyeshadow is hands down amazing. I got the one in the shade 'Guns and Rose Petals', which is a kind of pink/silver colour.
The eyeshadow is quite creamy, but looks like a foiled eyeshadow when used. It is very pigmented but ideally should be applied with your finger rather than a brush to get the most out of the product.
Rating: 4.5/5
Go Camo Concealer
The Go Camo concealer claims to be a 'full on coverage concealer'. The formula is quite thick and does have quite heavy coverage. I have heard that for people with dry skin it can pick up dry patches, but on my oily skin it works quite well.
Rating: 3.5/5
Fresh & Flawless Powder
I bought two shades - Light Beige and Deep Natural - for when I am tanned vs naturally pale. The powder is quite a thick, pigmented powder when used heavily but can be lightened in both weight and pigment depending on its usage.
 |
| L-R Light Beige, Deep Natural |
Light Beige is the lightest shade in the range. It appears very yellow toned, but I found it did not show up as yellow when used lightly & blended out. Deep Natural is a darker, more warm toned shade but is quite light when blended.
The compact can be flipped open to reveal a mirror and sponge, which makes it handy to take with you.
Rating: 4/5
Overall I am really liking Australis, and defintely think I will be purchasing more from them in the future, especially the Velourlips and Metallix eyeshadows. I hope this was helpful! Let me know how you like Australis.
- Ella
Friday, 6 November 2015
Ariana Grande Focus Makeup Tutorial
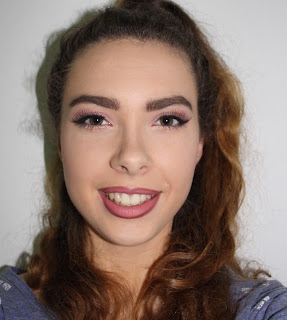
Hi everyone, today I am sharing with you a makeup tutorial for Ariana Grande's new music video, Focus. I love her makeup in the video, so I tried it out, including the two lip colours!
2. In the video she looks like she has a soft contour, so I used a cool toned powder to create a softly blended contour under my cheek bones, and a lighter powder to slightly highlight areas of my face.
1. After priming my eyelids, first I used a matte pink in my crease.
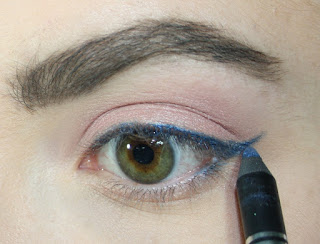
3. For the liner, I used a dark blue to create a wing - it doesn't have to be perfect, & you can use a q-tip to neaten it & slightly smudge it out.
4. Next I used an angled brush with a mix of blue & black eyeshadow to create the deep blue smudged wing
5. On her lower lash line, Ariana has a nude colour. First I used a nude eyeliner to line just under my lower lashes.
6. Next I used a similar shade of eyeshadow to set the liner.
7. I then curled my lashes and added mascara.
8. Finally I added some lashes which I felt closest matched Ariana's in the video - natural but slightly flared out at the outer lashes.
1. For the first lip colour I used a light pink lip liner to fill in my lips. Then I used a light pink gloss over the top.
2. For the lined lips, I started by filling my lips with a light pink/berry shade. Then I carefully lined the outside of my lips with a darker berry liner, following the shape of my lips. The line is quite thick which makes it easier to perfect.
And that's it! Let me know if you liked this tutorial and if you would like to see more like these. Also feel free to make any suggestions!
- Ella
What you will need:
- primer, foundation, concealer, powder
- cool toned contour powder & lighter matte highlight
- eyebrow pomade or pencil
- eyeshadow primer
- matte light pink eyeshadow & shimmery light pink eyeshadow
- blue eyeliner
- navy blue eyeshadow or blue & black eyeshadow
- mascara, false eyelashes (optional)
- light pink lipliner or lipstick & gloss
- deep berry lipliner & lighter pink lipliner or lipstick
Base
1. First I started with my base: primer, foundation, concealer and powder to recreate her flawless matte base.2. In the video she looks like she has a soft contour, so I used a cool toned powder to create a softly blended contour under my cheek bones, and a lighter powder to slightly highlight areas of my face.
Eyebrows
Ariana's eyebrows are quite straight and blunt, so I outlined my eyebrows in a straighter fashion, making sure not to overdraw them, then filled them in.Eyes
In the video, she has two slightly different eye looks, but for this tutorial I am going to recreate this one.
2. Next I used a shimmery pink shadow on my lid.
3. For the liner, I used a dark blue to create a wing - it doesn't have to be perfect, & you can use a q-tip to neaten it & slightly smudge it out.
4. Next I used an angled brush with a mix of blue & black eyeshadow to create the deep blue smudged wing
5. On her lower lash line, Ariana has a nude colour. First I used a nude eyeliner to line just under my lower lashes.
6. Next I used a similar shade of eyeshadow to set the liner.
7. I then curled my lashes and added mascara.
8. Finally I added some lashes which I felt closest matched Ariana's in the video - natural but slightly flared out at the outer lashes.
~
Lips
In the video Ariana has two lip colours - a glossy pink lip and a lined berry lip.1. For the first lip colour I used a light pink lip liner to fill in my lips. Then I used a light pink gloss over the top.
2. For the lined lips, I started by filling my lips with a light pink/berry shade. Then I carefully lined the outside of my lips with a darker berry liner, following the shape of my lips. The line is quite thick which makes it easier to perfect.
~
- Ella
Subscribe to:
Comments (Atom)


